![]()
Digital Product Instructions & Documentation
Getting Started
Set Up a New Design
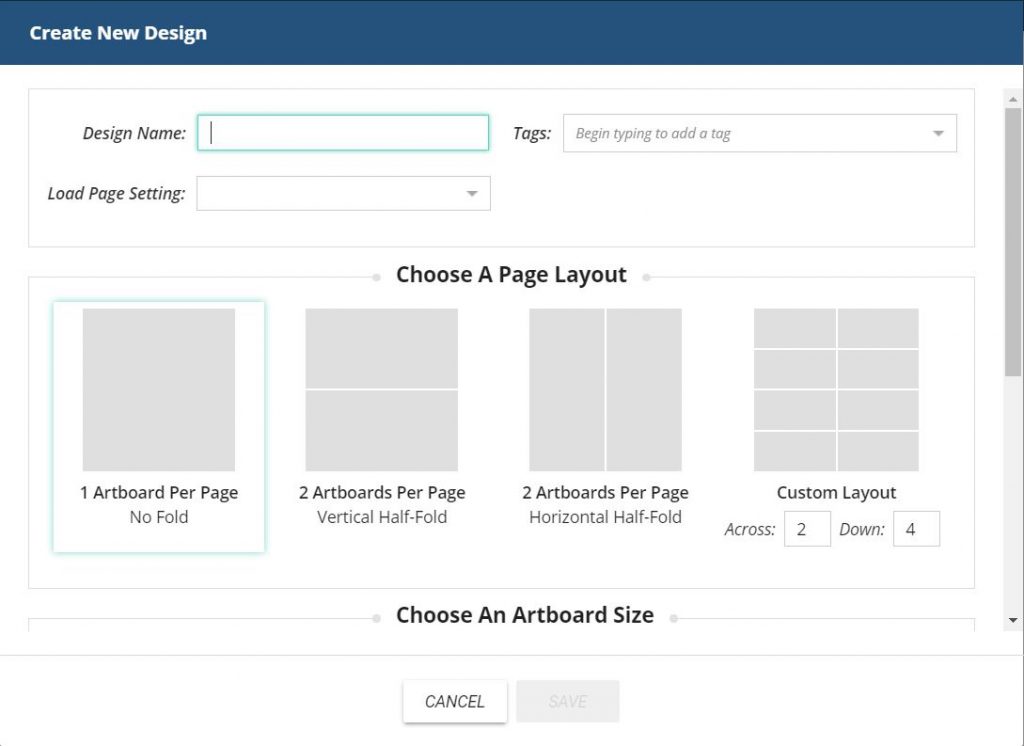
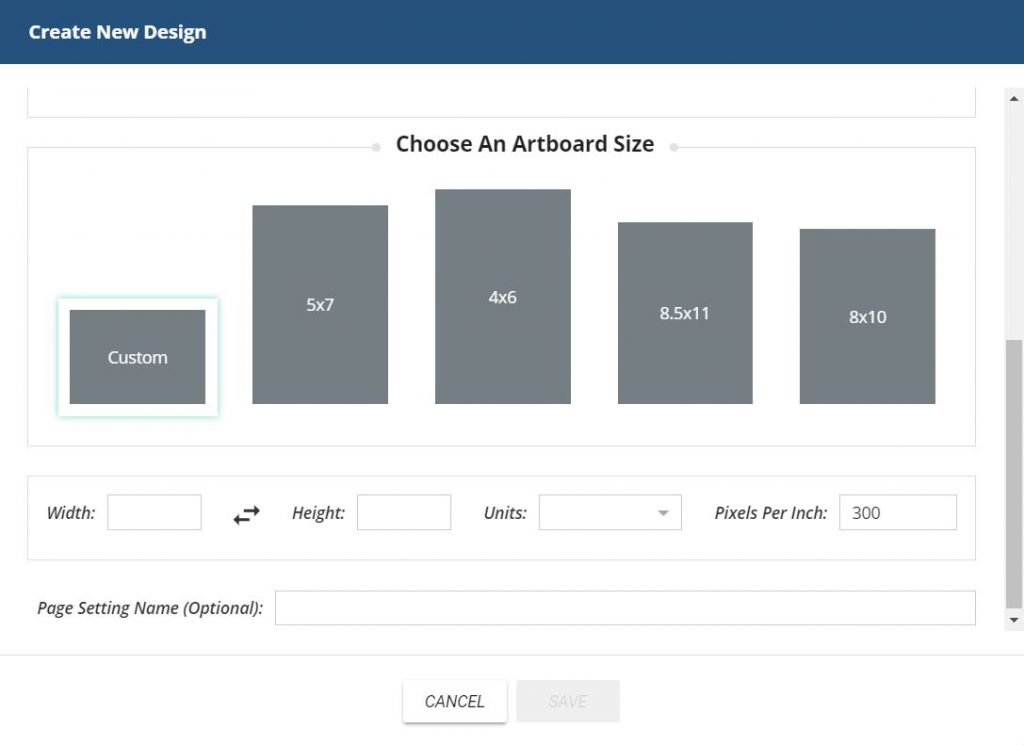
- Set Up an Artboard– Login to Corjl, then select Create New Design and choose Digital or Paper Item Design. Start by adding the design name and tags (image 1). Choose a page layout, then scroll down to choose an artboard size or create a custom one (image 2). To create a custom artboard, select Custom, then enter the artboard details below. You can switch from landscape to portrait view, or vice-versa, by clicking on the arrows between the measurements. If you want to save the artboard size for future use, enter the name in the Page Setting Name box, then save. You’ll be able to choose the artboard from Load Page Setting in the drop-down box next time you create a design. Please note that you can have up to 4 different designs open at the same time (can switch between designs using tabs).
- Add/Hide Rulers – Add/hide a ruler around the artboard. Right click directly on the artboard, then go to View>Show/Hide Rulers.
- Images– Use RGB color for all images you want to upload. Bulk upload elements (up to 20 at a time) using the formats PNG, JPG, SVG or GIF (supports animated GIFs). If you’re uploading text as an SVG, be sure to outline or convert it into a shape before uploading. Maximum image size is 6MB (please contact support if you need the file size limit raised for your shop). Once uploaded, tag or rename items. Double click or drag an image onto the artboard.
- Fonts – Upload your own fonts, or add them from the Font Gallery (includes over 600 free fonts and includes hundreds of server-licensed fonts provided by Creative Fabrica for an additional fee). The fonts you add or upload will show up under both My Fonts and Design Fonts. To tag fonts, right click and select Edit Properties. Rename fonts for your own use (customers will see real names of fonts). To delete a font from My Fonts, right click, then select Delete. To remove a font from Design Fonts, right click, then select Remove From Design. Check the Select All box to quickly select your desired fonts.
- Auto-sync Fonts Option – To load a preset number of fonts into any design, use the Auto-sync with Tagged Fonts option. When checked, a text box labeled Sync Tags will appear and allow you to type in the name of the tag you have given to select fonts and add that group of tagged fonts to the Design Fonts selection for that design.
- Info Tab
- Saving and Printing Options – Choose how an item is processed once a customer has finished personalizing:
- Digital Items – If your customer will be downloading and printing the item, select Customer Prints Design. Choose the download formats – JPG, PDF, SVG, PNG and Tiny PNG. If you select Flatten PDF, the layers in the design will be flattened when downloaded as a PDF. Customers will be able to edit and save the design until they mark Approve Proof. Once marked, they will be able to download, but will not be able to make changes to the design. If you want customers to be able to make changes without restrictions, select Customer Can Edit After Saving. Your customers will be able to change and save their designs as many times as needed.
- Printed Items – If you will be printing and shipping the item after your customer has completed personalizing, select I Process The Order After Saving. Once your customer has finished and selected Approve Proof, they will no longer be able to make changes to their item, and you will be able to see that the item is ready to process in View Orders. If you want your customer to be able to continue making changes after approving their design, select both I Process The Order and Allow Customer to Edit Design. The customer will be able to make and save changes, if needed.
- Show Bleed in Download Options – Select this if you want customers to have the option of including a bleed when downloading.
- Design Settings
- Properties – Change the design name, add or delete tags, change the artboard size and PPI.
- Show Bleed – Select Show Bleed if you want customers to see a bleed when personalizing their items. You can also choose the bleed size by entering a value in the provided box. If you want customers to have the option of including a bleed when downloading, but don’t want it visible on the artboard, deselect Show Bleed, then scroll up and select Show Bleed in Download Options (under Saving and Printing Options)
.Image 3

- Listings Section
- Add Design to a Listing – Designs will need to be added to a Listing in Corjl that will correspond with an Etsy or Shopify listing (see the Setting Up Corjl Listings section for more information). To add a design to a listing, click in the box where it says Listing and either type to search for the name of an existing listing, or type in the name of a new listing, then click the Save button to add that design to the listing. You can also add the design to more than one listing by repeating this process.

- Add Design to a Listing – Designs will need to be added to a Listing in Corjl that will correspond with an Etsy or Shopify listing (see the Setting Up Corjl Listings section for more information). To add a design to a listing, click in the box where it says Listing and either type to search for the name of an existing listing, or type in the name of a new listing, then click the Save button to add that design to the listing. You can also add the design to more than one listing by repeating this process.
- Customer Settings
- Max Downloads – Control how many times a design can be downloaded. Customers will see a number next to the download icon, showing how many times they have left to download. To add downloads to a purchased item, go to View Orders, open up the customer order and select from the drop-down box, located in the Items Ordered section.
- Customer Can Change Background – If this option is selected, customers will be able to change the artboard color or background image, if images are provided by you in the Background Images tab.
- Customer Can Duplicate Pages – Choose to allow customers to duplicate artboards. Please note that customers will not be able to add blank artboards.
- Customer Can Add Text Boxes – If this option is selected, customers will see a button in the tools panel that says Add Text Box. Customers will be able to add additional text to their item.
- Customer Can Upload Im Design to a Listing – Designs will need to be added to a Listing in Corjl that will correspond with an Etsy or Shopify listing (see th ages– If this option is selected, customers will see a button in the tools panel that says Add New Image/Replace Image. Customers will be able to upload a new image or replace an existing image with their own uploaded file.
- Allow Direct Orders (contact support to add this option to your account) – Provide a link to a design for customers outside of your shop (for example, a Freebie). Check the Direct Link box, then copy. Customers will have access to the design without needing an order ID. Please note that per transaction fees still apply to these types of orders. Uncheck the Direct Link box to disable the link.
- Saving and Printing Options – Choose how an item is processed once a customer has finished personalizing:
- Account Information and Settings – Find Settings and Billing History under your seller profile (top RH side of the page).
- Settings – Clicking on the Settings option will open up the Settings tab. Here you will find:
- Account Settings
- Update Password – Change and update your password here.
- Sales Channels – This is where you will connect your Etsy or Shopify stores to your Corjl Account. You can add or change your connection to your shops by clicking on the Change button.
- Listing and Design Settings
- Default Listing Settings
- Customer Instructions -In this area, you can set your Customer Instructions to be added to new Listings automatically when they are created. You can designate Instructions to be included in Orders and/or Demos. For more information, see the Customer Instructions section below.
- Order Expires – You can set a default amount of time until your customer’s orders expire here. This setting will apply to all new Listings. Expiration time for individual orders can also be changed manually in the Orders tab.
- Default Design Settings – You can set default Saving & Printing Options and Design Settings options (that you would find under the Info tab) for designs here. Settings made here will apply to all new designs unless changed manually.
- Default Listing Settings
- Billing Settings
- Payment Settings – Change or update credit card information here.
- Subscription Plan – Change payment plans, manage Creative Fabrica subscription, or cancel account.
- Seller Protection Settings
- Overlay Watermark Settings – Manage the watermark that shows over your designs in Demo mode. The Show Overlay Watermark in Demo box is checked by default. You can also upload your own Watermark image here by clicking the Use Custom Overlay Watermark box. Once selected, use the Upload Image button to add your own image. Follow the size restrictions when creating your own watermark, as well as setting the desired opacity before you upload the image.
- Image Watermark Settings – This option provides an extra layer of protection to images that you select from your My Images area in the Design page. To add an extra watermark to individual images, find that image in your My Images tab, right click on that image and select Edit Properties. In the Edit Properties windows, choose the Yes option from the Embed Watermark in Demo drop-down box. You can preview how the image will appear by clicking the Preview button. Click Save to apply
- Account Settings
- Billing History – Check your balance and view your transaction history. To view/download transactions for a given month, click on the arrow icon for that month (LH side of the date). A download icon will appear next to the Payment Method column that you can use to download your detailed transaction history for that month.
- Settings – Clicking on the Settings option will open up the Settings tab. Here you will find:
- Customer Instructions – Create your instructions as a design in Corjl (from scratch or use the ones provided in your Welcome Packet). If you want your customers to be able to download the instructions, check the PDF option as well as the Customer Prints Design option under the Info tab. (Leave all options unchecked if you do not want them to download.) Once created, you can add your Instructions to your Corjl Listings in two ways:
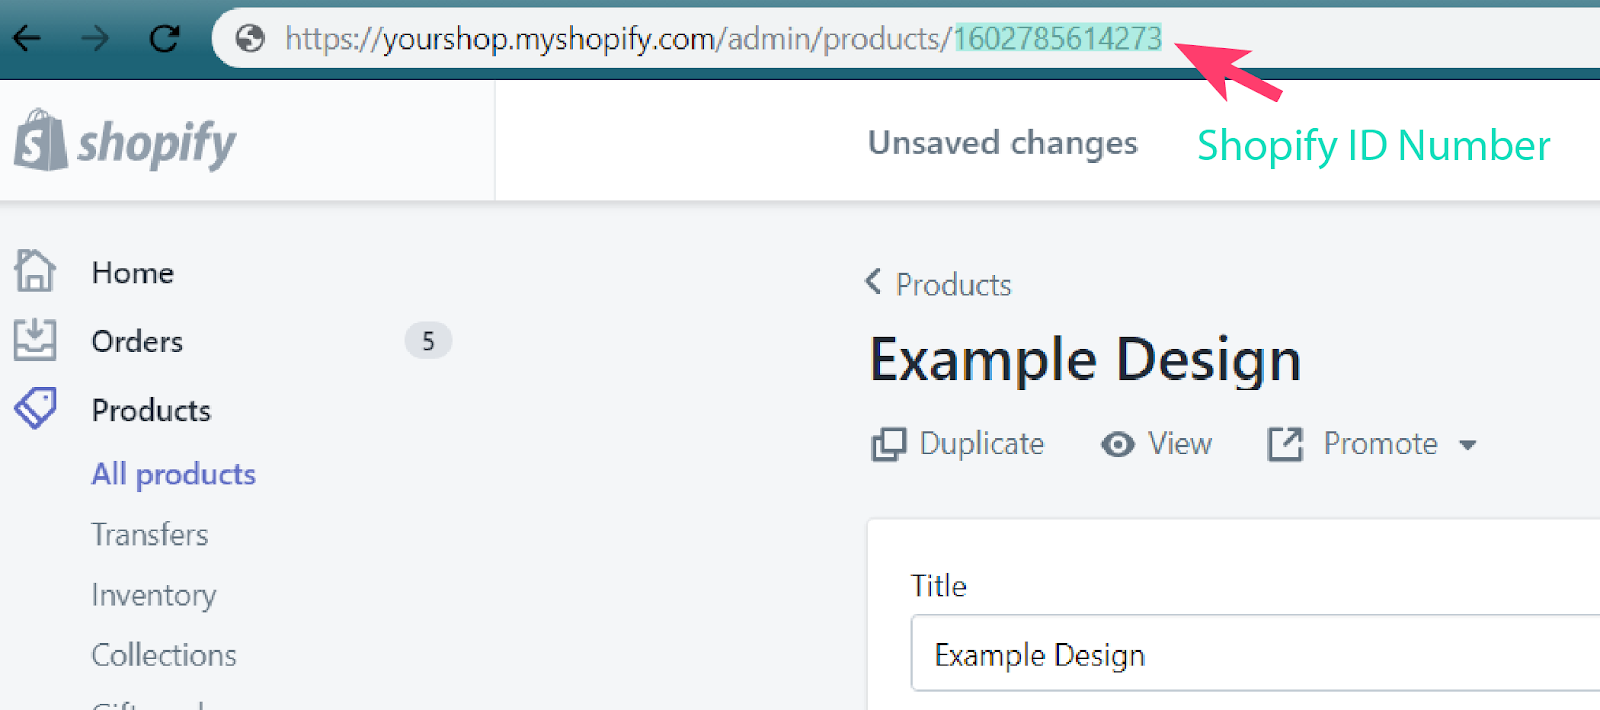
- Add to the Default Listing Settings – By adding your customer instructions to the Default Listing Settings, they will be automatically added to each new listing you create. After going to the Listing and Design Settings tab in your account Settings (upper-right drop-down menu), you add the Instructions by copying and pasting the Design ID number for the Customer Instructions you created into the designated area labeled Instructions to Include in Demo and Instructions to Include in Order. You can find the Design ID number in the URL address at the top of the Design Page for the instructions. At the end of the URL, you will see an ID number (see Image 3). Adding Customer Instructions this way will automatically check the box for Instructions in the Listing Page for that design.
- Manually Add to Listings – You can also manually add Customer Instructions to a Listing by clicking on the Add Designs to Listing button on the bottom of the Listing Page, searching for the Customer Instructions design, and adding it to the Listing. You will need to manually check the box in the Instructions column for the design once added.
Create a Design
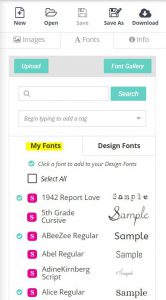
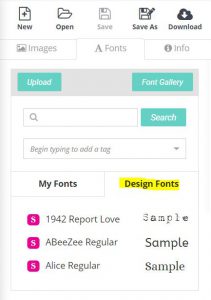
- Choose Design Fonts – Pick the fonts you want for each design by selecting from My Fonts (image 5), or choose all by clicking on Select All. The selected fonts will automatically be added to Design Fonts (Image 6) and customers will have access to these fonts as well. You can use the fonts from this list in your design. Please note that your customers will only have access the the fonts you include in this list. Tip: Right click on a font and select Edit Properties to add tags. You can then easily find fonts by entering a tag in the search box that says Begin typing to add a tag. You can also use the Auto-sync option to automatically add a group of tagged fonts to the design (see the Set Up a New Design section for details).
- Change Artboard Color – Change the artboard color under the Images tab. Select the Background Images tab, then click on the color box to change the artboard color. Select the Transparent Background box to remove the artboard color. Customers will also be able to change the background image and color when the Customer Can Change Background option is selected in the Info tab.
- Add Images – Double click or drag an element onto the artboard. If your image is larger than the artboard, you can check the box that says Fit to Shrink and the image will be resized to fit onto the artboard. Please note that when customers upload an image, it will automatically shrink to fit. Use JPGs for photos and realistic images. PNGs are ideal for solid colors and images with defined lines (logos, text and graphics). If you want customers to be able to change the color/colors of your graphics, save/export your images as SVGs (outline text before uploading it as an SVG).
- Replace Images – To replace an image on the artboard, select the image, then find the image you want to replace it with under the images tab. Right click on the new image, then select Replace Selected Image.
- Add Background Images – Add a background image to an artboard, plus create a background library for your customers to access and use in their designs. Go to the My Images tab, right click on the images you want to add and select Add to Backgrounds. Please note that the background images will tile if they aren’t the exact dimensions of the artboard. Next, uncheck No Image and select the background you want to add, then go to the Info tab and select Customer Can Change Background, under Customer Settings. Customers will then see a button in the tools panel that says Edit Background which will allow them to change the background image.
- Auto-sync Background Option – You can also Auto-sync backgrounds for a design the same way you sync fonts, by selecting the Auto-sync with Tagged Images option. When checked, a text box labeled Sync Tags will appear and allow you to type in the name of the tag you have given to select images and add that group of tagged images to the Backgrounds selection for that design.
- Add Customer Images – Include images for your customers to choose from when personalizing their items. To add an image, go to the My Images tab, right click and select Add to Customer Images. You can also Auto-sync customer images to a design (as with fonts and background images) by selecting the Auto-sync with Tagged Images option and adding the tag name you want in the Sync Tags text box.
- Add Shapes/Lines – Under the Images tab, you will see another tab with a shape icon. Select this to choose from several SVG shape options and add to your design. To style a shape, click on Style Shape in the tools panel, and you’ll see the option to add/change a stroke, add/remove a fill and change the color, opacity or rotate.
- Add Text – Double click or drag a font style from Design Fonts onto the artboard.
- Personalize – Change text directly on the design by double clicking into the text box. You can also change text using the text box located in the tools panel.
- Select Multiple Elements on an Artboard – You can select multiple elements on the artboard such as text boxes and/or images by either holding down the Shift button while clicking on the elements you want to select, or by clicking on the artboard and holding down the Shift button while dragging the cursor over the elements you want to select.
- Change Font Style – Change font style using the drop down box in the tools panel.
- Character Map – Click on the character map icon next to the font style drop-down box to access font glyphs. Select a glyph, click Copy and paste (CTRL or COMMAND + V) the glyph into the text box where desired. Please note that only the glyphs that have been assigned a unicode by the font creator will be available.
- Change Text Color – Change text color by clicking on the color rectangle in the tools panel. Choose a color or use Hex, RGB or HSL (click on the arrows to the right of the text box to change selection), or by clicking on the Color Picker (eyedropper tool) button to select a color from the artboard (click the eyedropper button when done to deselect the tool). You can create a color palette (up to 12 swatches) for customers by selecting Add Color.
- Change Font Size – Change text size using the drop-down box in the tools panel. You can also change the text size by dragging the corners of a text box in or out.
- Resize Text as Image – To stretch text vertically or horizontally, select Resize as Image in the tools panel.
- Freeze Text Boxes and Images – Freeze the location of an element and prevent it from being deleted, while still allowing customers to select and change it. To freeze an item, right click on it and select Freeze>Frozen.
- Set Textbox Width – If you want the width of a text box to remain unchanged when the text size is altered, right click on the text box, then uncheck Dynamic.
- Clipping Mask – Use any text or shapes from the Shapes tab as a mask for images. In the layers panel, drag the text/shape layer right below the image layer you want to mask, then right click on the image layer and select Create Clipping Mask. To release the clipping mask, right click on the image layer and select Release Clipping Mask. If you see a visible line around the text, change the opacity of the text to 0. For best results, we recommend downloading any design that utilizes the masking feature either as a JPG, PNG or flattened PDF (select Flatten PDF, under the Info tab). Also, please note that the clipping mask feature is currently not fully compatible with all browsers, including Internet Explorer and MS Edge.
- Hide Elements in Download -Keep items from showing when downloaded (great if you need to add a boundary layer or instructions directly onto the artboard). To hide an element in the download, right click on it and select Download Options>Hide in Download.
- Assign Element as Top Layer – Assign an element to stay positioned as the top layer, regardless if a customer adds an image (great for logos). Right click on the element you want to keep as the top layer, then select Order>Always On Top. Be sure to lock the element if you don’t want customers to be able to delete it.
- Character and Line Spacing – Adjust the character and line spacing using sliders or by entering a number manually in the tools panel.
- Add Stroke, Drop Shadow, Outer Glow and Opacity – Under Style Text and Style Images in the tools panel, add stroke, drop shadow, outer glow or opacity to your text and images.
- Gradient – Add gradient to text. You can use 2 colors and choose the angle of the gradient.
- Curve Text – Arc or create a circle with text. Adjust the width of the text box to the width of the desired arc or circle, then click Curved under Style Text in the tools panel and select Circle or Arc. Change the curve of the arc by using the slider in the tools panel. Adjust the spacing between characters in an arc by either clicking on the gray middle circles of the text box (RH or LH side) and dragging the text box inward or outward, or by adding spaces (using the spacebar) in front of or behind the text. To adjust the spacing between characters in a circle, add spaces (using the spacebar) in front of or behind the text.
- Blend – Use the blending tool under Style Text or Style Image (tools panel on the RH side) to change how graphics/text interact with elements beneath.
- Filter Options for Images– Under Style Image, you’ll see the option to change the Saturation, Brightness, Contrast, Sepia, Hue and Blur of an image.
- Alignment Tool – Select the Snap icon (horseshoe-shaped magnet) to turn on the snapping alignment tool.
- Flip – To flip an object, right click on the object, then select Flip.
- Align – Select the objects you want to align to each other, while holding SHIFT, then right click, select Align and make your selection (vertical/ horizontal centers or left/right/top/bottom edges).
- Distribute – To distribute items, select at least 3 elements. Next, right click and select Distribute, then make your selection. There are two types of distribute; Center Vertically/Center Horizontally means that the center points for each item are equally distant from each other. Space Evenly Vertically/Space Evenly Horizontally means that the distance between the edges of each item is the same. The first and last item will stay where they are and all of the items in between will be evenly distributed.
- Duplicate – Duplicate elements by clicking on the Duplicate icon (top RH side of the tools panel).
- Rotate Text Boxes & Images – There are 3 ways to rotate objects. One way is to select the object you want to tilt or rotate and hover your arrow on the white circle above it until you see a rotation icon, then click and rotate left or right. You can also rotate an object 90, 180 or 270 degrees by right clicking on the object, then selecting Rotate from the popup menu. Finally, an element can be rotated more precisely, using the rotation feature under Style Images or Style Text.
- Duplicate Pages and Add Artboards – Add, duplicate or delete artboards/pages using the tools above the artboard. Use the arrows above the artboard and scroll left or right to view different pages.
- Layers Panel –
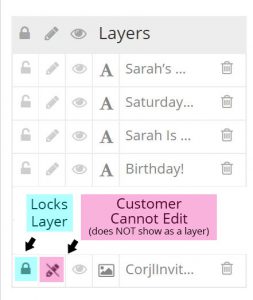
- Lock – Lock or unlock elements in the layers panel using the Lock icon. If an object is locked, customers will see it as a layer in layers panel and can arrange objects in front of or behind the layer (they cannot unlock the object). Please note that you, as a seller, will be able to unlock ALL layers when logging into your customer’s orders through View Orders>Login as Customer.
- Hide Layers – Hide a layer by clicking on the Pencil icon. Customers will not be able to select/edit the object on the artboard, and the element will not show up in the layers panel (see image below).
- Saving – Save or Save As in the top LH side of the menu. You will see a pink star next to the design name (above the artboard) if changes have been made to the design that have not been saved.
- Downloading –
- Choose a Format – Designs can be downloaded in 5 different formats, including JPG, PDF (flattened or layered), SVG, PNG, and Tiny PNG. If your customers will be downloading their own designs, you can control which formats they can download under the Info tab. Please note that PNGs and Tiny PNGs download with a transparent background.
- Include Bleed/Trim Marks – Include a bleed option for customers by selecting Show Bleed in Download Options, under Saving & Printing Options (see Design Info). Customers also have the option to include trim marks when downloading as a PDF.
- Choose Paper Size – If a design is downloaded as a PDF, customers can download the design alone (Design Default Size) or select a paper size to downloaded onto. The included paper sizes are letter (8.5×11 inches), legal (8.5×14 inches), ledger (11×17 inches) and A4 (21×29.7 centimeters). If the design is larger than any of the available paper sizes, customers will not see any of the paper options and the design will download as it’s designated size.
- Allow Multiples Per Page – Customers can choose to download multiple copies per page when downloading as a PDF, if the design will fit onto the designated paper size multiple times. Please note that designs (including the artboard) will fit up to .25-inch of the outer edges of the paper size selected.
- Choose Page/Pages to Print – Customers can choose to download individual or all pages. All pages download as zipped files for JPG and PNG formats, unless the files are 5 pages or less (customers will have the option to download zipped or unzipped if 5 or less pages).
Setting Up Corjl Listings
Corjl uses Listings to correspond directly to the listings you will create in Etsy or Shopify. So after creating a design, you will add that design to a Corjl listing, and that listing in Corjl will connect to an Etsy or Shopify listing using the Etsy Listing ID or Shopify Product ID. You can access your Corjl listings by selecting the View Listings option from the Welcome Menu or by clicking on the Listings icon in the upper left page.
When you first open up View Listings, you’ll see a list of all Corjl listings in your account and can search for specific listings or create new ones here. Some other things you will see are:
- Listing name
- Listing tags
- The number of designs included in a listing
- How many times a listing has been sold
- If the listing has variations
- Etsy and/or Shopify listing Ids that are connected to the Corjl listing
- Date that the listing was last modified
Creating Corjl Listings
- Listings Section in Design Info Tab – As stated under the Set Up a New Design section above, you can add a design directly to a listing by going to the Info tab for that design and either adding to an existing listing or typing the name of a new listing and saving to the new listing. The new listing will now appear in the list under the Listings tab when selecting either the Listings icon in the top menu or the View Listings option from the Welcome screen.
- Create New Listing Button – you can also create a new listing by clicking on the Create New Listing button from the Listings tab view. After clicking on the button, the Create New Listing box will appear. Type in the name of the new listing and click Save. The Listing Page for the new listing will open and you can then add designs to that listing using the Add Designs to Listing button (see next section).

Editing the Corjl Listing Page
After creating a listing, you will be able to see that listing in the list view on the Listings Tab. Click on the name of the listing you would like to edit and the Listing Page will open in the Listings tab. Below is a summary of the different sections found on the Listing Page and how to edit each section.
- Listing Information Section – In this section you will find the following areas:
- Thumbnail – You can change the thumbnail image that shows next to a listing in the Listings Tab by clicking on the Change Thumbnail option.
- Listing Name – To edit the listing name, click on the text box under Listing Name and type to edit text.
- Tags – Use this area to add or remove tags to the listing.
- Demo – You can find the Demo link to use in your Etsy or Shopify listings in this area here. Either highlight and copy or click on the Copy icon to the right of the text field to copy the link.
- Etsy Listing ID/Shopify Product ID – Add the listing/product ID’s from Etsy or Shopify here.
- Designs Section – Add, edit and arrange the designs you want to include in the listing here.
- Add a Design – To add a design, click the Add Designs to Listing button. Select the design you wish to add to the listing, then either double-click or drag and drop the design into the Added Designs area to add that design to the listing. Once added, click the Done button in the lower right of the page.
- Arranging Designs – When customers click on their Corjl link, whatever design that is on the top in the Designs area will open first. You can change the order of the designs in a listing by clicking on the “arrows” icon to the left of the design and drag the design either up or down in the order.
- Variations – If you have any variations set in the Etsy or Shopify listing attached to the Corjl listing, they will appear in this area. To assign a variation option to a design in the listing, click on the Edit Variations button in the bottom left of the page. This will allow you to select a variation option from a drop-down box and assign it to the design. To assign multiple variations to one design, click and hold the Ctrl button while selecting the desired variation options. Designs assigned variation options will be the design that customers will see when they place an order selecting those particular variation options on Etsy or Shopify. To include a design no matter which variation option customer’s have chosen, leave the variations set to [ALL OPTIONS] in the variations box. Click on the Close Variations button when you are done editing.
- Include in Order – Checking or unchecking the boxes next to a design in this area will either include or uninclude that design to the order. Unchecked items will not appear in the customer’s order.
- Include in Demo – Same function as the Include in Order boxes, except unchecked items will not appear when the customer clicks on the demo link.
- Instructions – Checking the box in this column will designate the design as a set of Customer Instructions. This means that the design will not have a watermark appear on it in the demo, also that it does not affect the Order from being marked Complete when showing Incomplete for the design
- Remove – To remove a design from the listing, click on the trash can icon next to the design. Clicking the icon will only remove that design from the listing; it does not delete the design from your Corjl designs.
- Saving Changes to a Listing Page – Save any changes you have made to a listing by clicking on the Save button found in the top right of the Listing Page.
- Deleting Listings – You can delete a listing by clicking on the “trash can” icon found next to the listing’s name at the top of the Listing Page.
Setting Up Etsy or Shopify Listings
Setting Up Demos – If you want customers to demo their items before purchasing, you can provide a link in your shop listing details. Demo links can be found on the Listing Page for a Corjl listing. Copy the link and paste it into your Etsy listing details area. You can add or exclude designs from a demo by using the Include in Demo checkboxes found on the Corjl Listing Page.
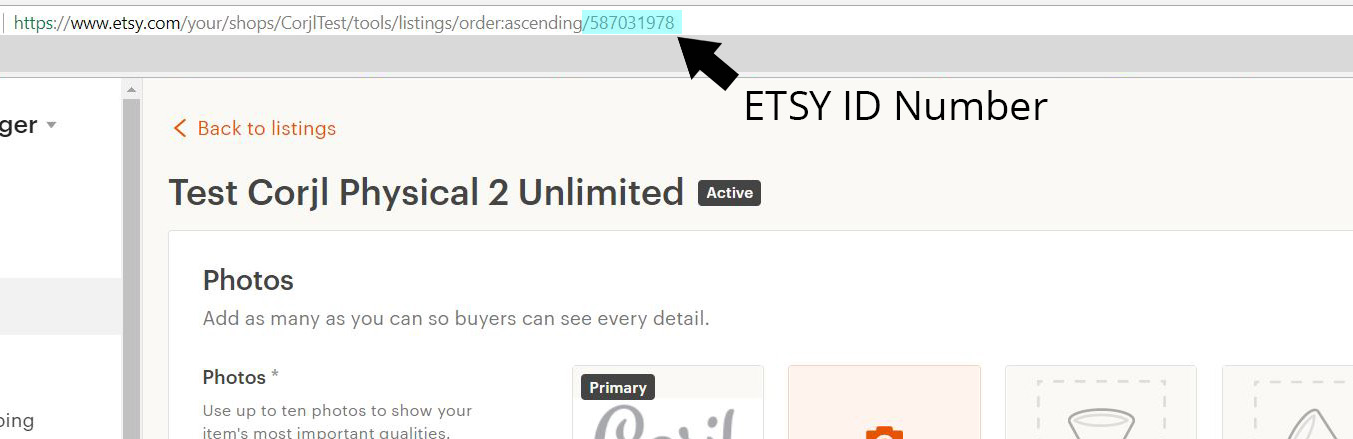
Connecting Etsy Listings to Corjl Listings – To connect a Corjl listing to a shop listing, you will first need the shop listing ID number. To find the shop ID number, open up a shop listing to edit, and you will see a number at the end of the URL (see image 8 & 9 for example). This is the ID number. Copy the ID number and paste it into the Etsy or Shopify ID section in theCorjl Listing Page.
Attachments for digital items in Etsy: Etsy requires that sellers include an attachment to a digital listing. Since customers will not be downloading their items on Etsy, we recommend attaching instructions that direct them to access their items in Corjl. Use the one provided in your Welcome Packet, or create your own (use the following copy as a guide):
Access your item NOW by doing one of the following:
- CHECK YOUR EMAIL: A message from Corjl has been sent to the email address associated with your Etsy account. Click on the provided link, then create an account to access your items.If you do not see the link, make sure you are checking the email address associated with your Etsy account. Also, If you need the link sent to a different email address, please contact your selleror
- Your order number can be found on Etsy by going to You>Purchases and Reviews and by clicking on View Receipt. The order number will be on the upper left-hand side of the receipt.Your order number can be found on Etsy by going to You>Purchases and Reviews and by clicking on View Receipt. The order number will be on the upper left-hand side of the receipt.
Managing Orders
Accessing Items After Purchasing–
There are two ways customers can access their purchased designs:
- Corjl will immediately send an email to the address associated with your customer’s Etsy/Shopify account with the link to login and access their items (customers will need to create a Corjl account and accept the TOS before accessing their items).
- Customers can also go directly to Corjl.com and follow the prompts, using their order info to access their purchased items:
- Etsy customers will need an email and their Etsy order number(not transaction number) to access their order.
- Shopify customers will need an email, Shopify order number, Shopify shop name and Shopify email (or phone, if they didn’t provide an email)
Orders Tab
You are able to view and manage customer orders in the Orders tab area. Open the Orders tab by either selecting View Orders from the Welcome page menu, or by clicking on the Orders icon in the upper right of the screen.
- Search Orders – You can search for orders by using the following options;
- Search Bar – Search by email address, username, or order number by typing here.
- Search by Status – Select a status option from the drop-down menu and all orders with that same status will appear.
- Search by Date – Either type in a date or date range (must be in same format) or click on the calendar icon to search for orders placed on a given date.
- Search by Source – Select an order source from the drop-down menu (Etsy, Shopify, Manual or Direct Link). All orders with the same source will appear.
- Order Details – To view the details of an order, click on the arrow icon to the far left of the order. This will open up the details view for that order. From here you will see the following options:
- tem in Order – This section will show the Corjl listing associated with the order and the designs that are in that listing. For each design within the listing, you will be able to see the following information and options:
- Status – The editing status of the design.
- Download – Download the customer’s design by clicking on the download icon next to each design.
- Downloads Left – Tells you how many downloads are left for a design. You can edit the number of downloads by clicking on the “pencil” icon next to the download amount. Choose to either increase or decrease the number of downloads then click Save to change.
- Item Expires – Tells when customer access to the design will expire. Change the time until expiration by clicking on the “clock” icon next to the time left. Either select a date from the calendar, or click the Never Expires button, then click Okay to change time.
- Remove – Click the “trash can” icon next to a design to remove that design from the order.
- Order Options – The following items can be found and edited in this area:
- Change Status – Change the status of all the design in the order here by selecting the desired status from the drop-down box and clicking on the Change Order Status button.
- Resend the Order Email – You can resend the order email to your client here. Either send to the original order email address (default) or type in a new email address then click the Resend Order Email button.
- Login as Buyer – If you need to assist a customer with personalizing their item, login to the order as a buyer. You’ll be able to switch between Customer View (what your customer sees) and Designer View (your view/access to the designer tools). Please note that customers will NOT see/have access to the Designer View.
- Order Log – View customer logs to see the date and time an item was purchased, the link was sent, if the customer logged in, saved and downloaded an item, plus which devices were used to login. Please note that if you login to your customer’s account, your activity will be logged as well.
- Add Listing to the Order – Click this button to add a listing or selected designs from that listing to an order. After clicking a window will open prompting you to type in the name of the listing containing the design(s) you wish to add. Click the Add Item button and then select the designs you want to add to the order. Once selected, click the Save button to add the new design(s).
- tem in Order – This section will show the Corjl listing associated with the order and the designs that are in that listing. For each design within the listing, you will be able to see the following information and options:
- Manual Orders – Manual orders can be used to create a custom order, or to personalize an existing design for a customer. To create an order manually, click on the Create New Order button at the top of the Orders area. Type in the customer’s email address in the box. If you want to send an order link to the customer’s email, check the Send Email to Customer box. Select a listing for the order, then click Add Item to view the listing’s designs. After selecting the desired designs for the order, click the Save button to create the order.
Delivering Custom Orders created in Etsy – Custom orders will not be connected to an Etsy transaction, so you will need to add the order in Corjl.Set up custom listings in Etsy, then do one of the following:
- Create the custom design in Corjl. When an item is ready to send to your customer for personalizing, use the Create New Order button to create a manual order for the design. Make sure the Send Email to Customer box is checked.
- If you already have the item created and just need to personalize it for your customer, create the order using the Create New Order button, but leave the Send Email to Customer box unchecked. Click Save and then open up the order and login as a customer. You can personalize your customer’s item, then download it for them or save and process. If you’d like your customer to access the item in Corjl after you’re finished personalizing, click Resend Order Email. Your customer will receive the email link and can then follow the link to login and access their personalized item.